Monday, February 28, 2011
RIP Jane Russell
Labels:
Glamour,
Hollywood,
Movie Costume
Back to WOOORK - 2/28/11
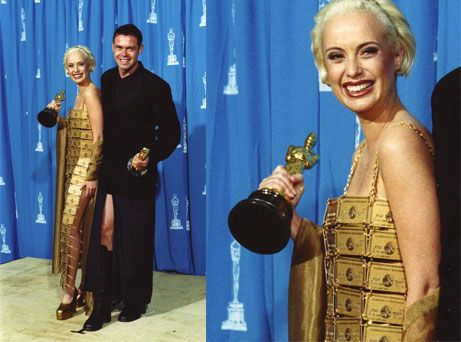
Last night was the Oscars and everyone looked wonderful, didn't they? But today's edition of WOOORK is not about last night's togs. It's about Oscar Night from years gone by. And the winners ARE...
Labels:
Academy Awards,
Arnold Scassi,
Barbra Straisand,
Bjork,
Bob Mackie,
Cher,
Lizzy Gardiner,
WOOORK
Friday, February 25, 2011
My New Frontier: A 1960’s cocktail dress: Part One - Introduction & Sizing Up the Pattern
Hi Everyone!
Our adventures in pattern drafting continue with our much loved circa 1960 cocktail dress, Spadea’s # N-1077, otherwise known as Philip’s stunning creation, Black Beauty!
Philip has already made up this dress as is, in its original size, out of a sumptuous black satin. Then, he proceeded to bedeck, bedazzle, and encrust his creation in iridescent black glass beads.
First, I trace all the original tissue pieces, marking all punch holes and perforations. This 1st tracing is now my master copy, and it will remain unchanged, as an exact copy of the real vintage pattern.
Spadea is a long-gone, mid-20th century pattern company, and their history can be found here.
As you can see, it is a wonderful example of finery and sophistication. Who wouldn’t be inspired by this amazing work of art?! |
Bottom Line: I want one. But I want a West-Coast version, made in a cool yet bold Hawiian Barkcloth, with no drape, and embellished with black palette spangles on the solid black background:
Our Spadea pattern is a vintage size 14, which is a modern day 6, which I am not.
![]() |
| I have *just enough* Hawiian Barkcloth fabric to create this dress with no drape... but how cute will it be?!?!?! |
In order to make this style fit, I will have to increase (grade up) the original pattern from a size 6 to a size 8 size 10.
What is my end goal?? To have a fabulous, flattering real vintage dress pattern that fits me. This Spadea style is perfect to start with because it is:
1.) Simple – Just a bodice, waistband, skirt, and optional front drape! The facings at the neck/armhole area can be easily replaced with bias tape to finish the inside, which I plan to do.
2.) Flattering –Bateau neckline, hourglass shape, what’s not to LOVE?
3.) Easy to sew - with areas of opportunity to tweak , simplify or improve the construction quality and finishing.
4.) Versatile –Looks great in anything from Satin to Cotton to Lame’! Can be made with or without the drape in front for a sleeker, or less formal look. In fact, without the drape, this is a simple, sweet little boat-neck wiggle dress….wooork!
Well, here I go again….a whole weekend of nothing but tracing & re-tracing patterns, and the results are worth every moment!
The entire original pattern consists of 9 pieces: Front/Back Bodice, Waistband. Skirt, facings, and the front drape. ***I will be showing the front bodice only as an example of the tracing/sizing up process. Note: The Front Drape piece will not be included in this 1st dress, but will be explored/sewn at a later date, in a different fabric.
First, I trace all the original tissue pieces, marking all punch holes and perforations. This 1st tracing is now my master copy, and it will remain unchanged, as an exact copy of the real vintage pattern.
|
| Original tissue pattern from 1960 |
I create a 2nd tracing from the first, and I make adjustments to the body width and length by slashing & inserting strips of paper. I have calculated how much I needed to add to the original pattern to make it fit me. In order to increase black Beauty up to a size 10, I had to add 3 ½” total to the original pattern width, and 1” to the total length.
![]() |
| 1st Tracing: Exact copy of the original (Sorry, the photo is light, but you get the idea :) |
![]() |
| 2nd tracing: slashed and spread to evenly increase length & width. |
Here's a lil' breakdown of what I did:
WIDTH: Since the patterns for the Bodice, Waistband, and skirt are placed on the fold and represent one quarter of the body, I divided my total width measurements by 4, then applied that number to each piece.
In other words, 3 ½” divided by 4 is 7/8”, so I added 7/8” to the width of each piece.
LENGTH: I evenly divided the 1” length needed between the bodice and skirt.
So, ½” was added to the bodice length, and ½” to skirt length.
The best way increase the overall size of a pattern, is to add throughout the body, instead of just adding to the side seams and bottom edge.
I’ve created these quick ‘n dirty images of the bodice and skirt to clearly show what I did, and what you should NOT do:
Once all the pieces are increased in size, I clean up the overall shape, double check & triple-check notch placement, making sure everything matches and lines up for good sewing.
Now all the pieces are ready to be cut in fabric!
![]() |
| 3rd tracing: All cleaned up in a size 10 and ready to use! |
Stay tuned for Part Two: “Sewing a Wearable Muslin” where the dress will come to life in all its size 10 glory!
-Kathleen, In Oakland
Labels:
1960s,
Black Beauty,
Bodice,
Sewing,
Vintage,
Vintage Pattern
Wednesday, February 23, 2011
Public Enemy Finished Product
Hey there readers! Sorry about the delay in posting the finished sweater vest, Public Enemy. Being that my camera ran away from home one night it was tough to take pictures of my progress. I did get myself a new camera though, so all is not lost and life can continue.
Well look what we've got here... well if it isn't a finished sweater vest.
When I last left you I had seamed up one shoulder in order to knit and apply the ribbing. First I knitted the armhole ribbing the width of one of the armholes. After it was finished I transferred the stitches from the ribber onto the knitter bed and hung the armhole onto the machine and crochet cast off the seam.
I wanted to try something new for the V-neck. Usually I knit the neck band in 2 pieces (round necks can be knit in 1 piece if the knitting machine is large enough), 1) one side of the front and the back of the neck and 2) then the other side of the front. But I figured since I was going to sew the center front as a miter I figured I would just knit it all in one piece and sew the center front like you would a jersey or any other cut and sew knit.
Here is the inside view of the Neck rib at the bottom of the "V". The trouble I found is that the bulk of the rib is a bit annoying but when you're wearing it you don't even notice it. Going forward I don't think I will repeat this technique I like the 2 piece neck better because if you sew it mitered you can press the seam allowance open and tack it to the seam and it looks much flatter.
Here is the outside view of the finished Neck rib. The bulk of the miter isn't all that noticable. But as I said before I'll stick to the 2 piece neck rib.
After my neck rib was finished I sewed up the other shoulder then repeated what I did for the previous armhole. All that was left was seaming up the side and weaving in loose ends. So far I've worn it once and it looked SUPER dapper. Next time I wear it I will make sure to snap a couple pics for posting.
Philip - In Brooklyn
Labels:
1930s,
Machine Knitting,
Menswear,
Public Enemy
Sunday, February 20, 2011
Back To WOOORK: 2-21-11
Hey Y'all!
Philip and I are getting really amped about our lil' trip to Las Vegas coming up in a couple months. Let's just say there's lots of lame' involved.
In an effort to grab Monday by the balls, today's Back to WOOORK is brought to you by the late, amazingly great Cyd Charisse and her famous pins, Vegas style:
And please take a moment to see her hard at wooork dancing the Franky & Johnny number from "Meet Me in Las Vegas" sung by Sammie Davis Jr.
-Kathleen, In Oakland
Philip and I are getting really amped about our lil' trip to Las Vegas coming up in a couple months. Let's just say there's lots of lame' involved.
In an effort to grab Monday by the balls, today's Back to WOOORK is brought to you by the late, amazingly great Cyd Charisse and her famous pins, Vegas style:
And please take a moment to see her hard at wooork dancing the Franky & Johnny number from "Meet Me in Las Vegas" sung by Sammie Davis Jr.
-Kathleen, In Oakland
Monday, February 14, 2011
Back to WOOORK!! - 2/14/11
Well here it is "Monday" again. This is a stupid day. YOU HERE ME GODS!! STUPID! But on the bright side it is fashion week here in New York Cit-ay, and the air is electric with champagne, contradictory fashion double speak and model puke. It's a magical season really. So in honor of fashion week this edition of WOOORK will be brought to you by the House of Dior, by John Galliano. Hope you enjoy it as much as I did and it helps you quickly forget today is "Monday" (insert dry heave noise).
Philip - In Brooklyn
Labels:
Christian Dior,
fashion,
Haute Couture,
Video
Tuesday, February 8, 2011
Hand In Glove, Part Deux: The Revenge of Mitts and Mittens!
Hey y’all!
This is just a little “Part 2” entry about our pattern restoration project we posted last week.
The main objective is to utilize an old, forgotten crumbling pattern, and create our own glove design with adjustable finger length.
However, I simply didn’t have the heart to ignore the Mitt and Mitten pattern also included in our original assortment…..seriously, how adorable are THESE?!
![]() |
| LOVE & NEW LIFE: These styles are also unique, and have fabulous potential! |
So, same process as the gloves: The original, fragile tissue pattern is traced AS IS onto white paper. Carefully mark the overall shape, all notches and punch holes:
Above Images: Left = Original Tracing of Mitten. Right = Oringinal Tracing of Mitt.
Double-check, TRIPLE-CHECK all markings, then, immediately put the tissue pieces back in the original envelope for long-term storage.
As with the glove pattern in the previous post, this first tracing is now the original, exact copy, and will remain that way for reference.
A 2nd tracing is made from the first:
![]() |
NOTE: Overall shape is “cleaned up” and all punch hole shapes are translated into modern-day labeling of grainlines, slash lines, and seam allowances. |
AGAIN, VERY IMPORTANT: Before these tracings are shipped to Philip for testing, I make a copy of each for our records, and the possible “what if’s” to be prepared for when developing any new pattern.
Enjoy!
-Kathleen, In Oakland
Labels:
gloves,
Vintage Pattern,
Vogue
Monday, February 7, 2011
Back to WOOORK!! 2/7/11
Welcome to yet another Monday. Seriously enough already with this retched day. On the bright side I have heard from the politico rumour mills that congress has been considering nixing the whole day altogether. That would be the first good thing they've done in a long time. So since this day emotes self loathing I felt that we needed a good soundtrack. Allow me to introduce my close personal friend Dame Shirley Bassey. So put this video on a loop, crank up the volume and slap the shit out of Monday!
Philip - In Brooklyn
Labels:
1960s,
Shirley Bassey,
WOOORK
Monday, January 31, 2011
Hand In Glove: Pattern Preservation and Re-use
Hello Readers!
As some of you may know, Philip and I are on a coast-to-coast adventure to appreciate and re-create gorgeous beautiful things from the past.
(And be sassy biz-natches the whole way!)
We have always shared a burning desire for custom-made gloves, ever since we saw Barbra slip them over her extra-long manicured nails in "Hello, Dolly".
![]() |
Babs had gloves made with extra-long fingers to accommodate her beautiful hands in historical films like Hello, Dolly!, Funny Girl, and our personal favorite: On A Clear Day You Can See Forever. |
Glove patterns are pretty damn near impossible to find, but we got lucky when Philip found this little gem from 1940's wartime:
![]() |
| This old pattern journeyed from New York to California! |
I started the painstaking process of tracing and interpreting the tiny, fragile pieces.
![]() |
Falling Apart: Brittle directions page and glove pattern pieces for fingers and thumbs. |
![]() |
Close-up of the revision date in these hand-illustrated instructions. Last revised: June 30, 1943!! |
![]() |
| Don't forget to copy the front and back of the envelope! |
So, the first thing to do is copy the directions as quickly and carefully as possible. As soon as you're done, fold the original back up and put away ASAP.
Sadly, the paper that these directions were printed on is so dry that it wanted to crumble and tear at the slightest touch!
I opened the directions ONE TIME ONLY, and carefully copied all sides on the xerox machine to 11x17" paper.
Sadly, the paper that these directions were printed on is so dry that it wanted to crumble and tear at the slightest touch!
I opened the directions ONE TIME ONLY, and carefully copied all sides on the xerox machine to 11x17" paper.
Before pulling out the pattern pieces, be sure to give those directions (the copy, of course) a good read-through. Take note of any special markings or symbols. Get to know the pieces through the pattern layout and instructions.
I traced all pieces as they were, marking all punch holes and symbols:
Once I double-check, then triple-check that all info has been properly captured, I immediately put alllll the pieces back in the envelope.
I traced all pieces as they were, marking all punch holes and symbols:
![]() |
| Some of the teenie-tiny pieces for the fingers were falling apart, so I had to machine copy, then re-draw. (no pressure, RIGHT?!) |
Now the old pattern can officially go back in its cool, dry, dark storage space :)
This first tracing, as seen in images above, is the true original pattern. I will keep it unchanged so I never have to pull out the old fragile pieces again.
Then, I trace a 2nd copy from the 1st unchanged tracing.
![]() |
| On this 2nd copy, I clean up the overall shape and "translate" the old pieces by changing the punch holes to clear printed labeling of the grainlines, seam allowance, details, and piece name. |
This is where the pattern goes from copy to customize, and our own design adjustments are made!
Philip and I want to create a glove pattern with adjustable finger lengths. So, I added a slash line through the fingertips of all pieces where length can be lengthend or shortene. (BLUE LINE)
This fresh, new pattern, along with copies of the original instructions and envelope, are neatly packed in a clear plastic sleeve, and shipped post-haste back to Brooklyn for Philip to test out:
Philip and I want to create a glove pattern with adjustable finger lengths. So, I added a slash line through the fingertips of all pieces where length can be lengthend or shortene. (BLUE LINE)
![]() |
| Close-Up of revised pattern for the glove body. |
![]() |
| Philip will begin mocking up our new pattern, testing the fit and construction, and make notes of any changes or progress. |
Always plan for the "what if's"....
Yay!
Labels:
gloves,
Sewing,
Vintage Pattern,
Vogue
Back to WOOORK!! - 1/31/11
I'm not gonna lie to you kids. Daddy had a rough weekend. I lost my camera! That's gonna put a damper on my posting skills. It's alright though I'll be getting a new camera. So in order to prop me up-right on this most evil of weekdays I called in the only thing I knew that could help.
There they are, Miss Kay Kendall's epic eyebrows. It's funny I have the same outfit in Black.... no I don't. I said earlier I can lie to you guys. You do have to admit Orry-Kelly knocked it out of the park on the "Les Girls" costumes. Essence of WOOORK!!!
Philip - in Brooklyn
There they are, Miss Kay Kendall's epic eyebrows. It's funny I have the same outfit in Black.... no I don't. I said earlier I can lie to you guys. You do have to admit Orry-Kelly knocked it out of the park on the "Les Girls" costumes. Essence of WOOORK!!!
Philip - in Brooklyn
Labels:
1950s,
Hollywood,
Movie Costume,
WOOORK
Subscribe to:
Posts (Atom)