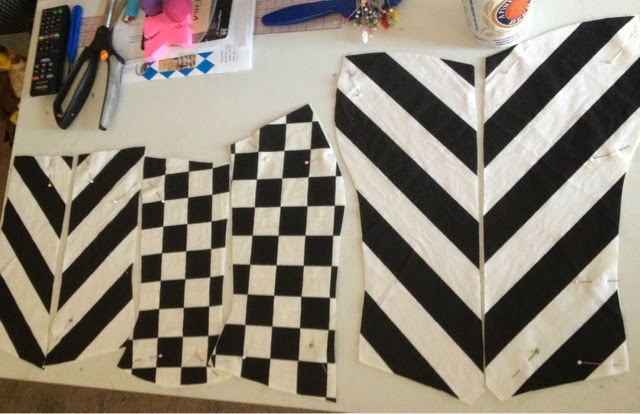
Bodice pcs are stitched together. Now I'm leveling out the skirt shape:
Thursday, October 16, 2014
Halloweiner costume: prepping the bodice pieces
Hey Y'all!
More progress: Flatlining and prepping the pieces for assembly.
After cutting, each piece of fashion fabric and muslin are layered together, then sealed together by stitching the edges.
First, a straight stitch on the sides to stabilize the layers from moving around.
I use the longest stitch length on my machine, 3/8" from the edge with no back-tacking. This acts as a running stitch or tailors tacks, and tension can be easily adjusted later to ease fullness and get pcs to join smoothly.
Next, they are finished with a zig zag stitch on a long setting to encase the raw edge. This can be done with a serger, if you have one.
I used random neon thread on the top side of the zig zag for a little pizazz on the inside:
CF Pcs: note the fullness at the bust curve has already been eased up a bit with the straight stitch for good cup depth and fit:
Side Front Pcs:
Side Back Pcs: (that puckering will go away when assembled)
Saturday, October 11, 2014
Halloweiner costume progress: Part the First
J'excuse dat Miller Lite in the background...
My bustier block, cut from scraps of black printed stripe and checker cotton with a white ground, flatlined in scraps of muslin.
Labels:
bustier,
Halloween,
Miller Lite,
Patterns
Monday, September 29, 2014
Back To WOOORK! 9-29-14
Sup!
It's Monday!
I made this.
It went to Burning Man and didn't fall apart.
Labels:
Burning Man,
Costumes,
Men's costumes,
stuffed animals
Monday, September 15, 2014
Back to WOOOOORK!
Huzzah, Bitches!
It's Monday!
Let's look at some purdy shit!
Thursday, May 22, 2014
OMG, Ponies!!!
Hi Everyone!
I tried cutting it up to re-work the fit...still, nothing wearable.
Another finished project to share today!
This one is great, because it was almost a total failure, then it became something better than the original plan!
This project involved Frankenstein-ing a couple of shirts together to make one really awesome shirt ...WITH PONIES ON IT!
Did I mention there were ponies?
And glitter? And tiny blue rhinestones? And NO pink??
Yeah.
![]() |
| Found this shirt in the Girls dept. at Old Navy. I bought the biggest size (XL) but it was still too small. |
Defeated, I put the shirt away in hopes of figuring something out, one day.
Months went by...
Then, I was doing some spring cleaning and found a basic men's size M tee in my stash that happened to be the same shade of blue as the pony print! A vibrant violet blue!
So, I turned the mens Medium tee into a Women's8 Size Size 10 peasant top!
Here's a lil' sketch of what I did:
After that, I simply cut out the pony print, and machine appliqued the image on top of the shirt, using a 2 rows of straight stitches, 1/8" apart, approx. 3/8" away from the raw edge.
The finished product looks like THIS:
As you can see, it fits her great, and she is very happy:
Another project....DONE!!!!
I will do another post on converting Man-Tees into Girl-Tees in the near future :)
-Kathleen, In Oakland
So, I turned the mens Medium tee into a Women's
Here's a lil' sketch of what I did:
![]() |
| Red line indicates the changes: Crew neck was cut out and changed to "peasant" style with adjustable ribbon drawstring. Side seams were added to reduce the waist and add curves in the right places. |
The finished product looks like THIS:
As you can see, it fits her great, and she is very happy:
Another project....DONE!!!!
I will do another post on converting Man-Tees into Girl-Tees in the near future :)
-Kathleen, In Oakland
Labels:
Applique,
Peasant Shirt,
Ponies,
Sewing,
T-Shirt
Wednesday, May 21, 2014
Let's have a Kiki, with thread!
Hi Everyone!
Lots going on...lots of projects to share!
Today's post is something small: Making patches from fabric scraps.
I doodle and sketch ALL THE TIME.
If I want a tiny project to work on & finish quickly, I turn some of my sketches into patches.
Simply copying the image to a square of sturdy woven fabric, and embroider by hand or machine.
I doodled this on a manila folder at work, allegedly:
This doodle became a patch, which was later used to mend a motorcycle jacket for a friend, who's nickname is "Moose"
I usually sew BIG projects with one color of thread (black, white or natural) so making these patches are a nice change of pace, and COLOR.
I love working all the bright color threads against the dark background, and this is a great way to flex the stitching skills.
I have never "embroidered" by hand before, and was just sort of freestyling here...
First, I sewed the image using a backstitch, with about 3 different shades of yellow thread together:
Then, went back over everything again to fill out the spaces, using some other stitch I may have made up, linking the backstitches together:
-Kathleen, In Oakland
Lots going on...lots of projects to share!
Today's post is something small: Making patches from fabric scraps.
I doodle and sketch ALL THE TIME.
![]() |
| Fun Fact: If I'm in a meeting and appear to be taking detailed notes, there's a 90% chance that I'm probably sketching up a new project or doodling something cute, like this....Yay, Kitties! |
If I want a tiny project to work on & finish quickly, I turn some of my sketches into patches.
Simply copying the image to a square of sturdy woven fabric, and embroider by hand or machine.
I doodled this on a manila folder at work, allegedly:
This doodle became a patch, which was later used to mend a motorcycle jacket for a friend, who's nickname is "Moose"
I usually sew BIG projects with one color of thread (black, white or natural) so making these patches are a nice change of pace, and COLOR.
I love working all the bright color threads against the dark background, and this is a great way to flex the stitching skills.
I have never "embroidered" by hand before, and was just sort of freestyling here...
First, I sewed the image using a backstitch, with about 3 different shades of yellow thread together:
![]() |
| This patch is for my sister. Her nickname her whole life has been "Kiki" Ain't she LUCKY!? |
-Kathleen, In Oakland
Tuesday, May 20, 2014
We're baaaaaaaack!!
Labels:
Angela Lansbury,
The Harvey Girls
Monday, November 28, 2011
Back to WOOOK!! 11/28/11
I hope everyone had a wonderful Thanksgivings! I spent the entire weekend building Ikea furniture and setting up my Black Friday purchases around the house (we only bought interior type stuffs). We did take breaks every now and again... 7 - 40 minute breaks in fact. This was the perfect amount of time to fully take in the glorious show that is "Downton Abbey." We watched the entire first season over the weekend.
I'm not going to bore you with details about the show or how much I loved it (WHICH I TOTALLY DID!) I will however let the pictures do the talking! Look at all this workness!
Philip - In Brooklyn
I'm not going to bore you with details about the show or how much I loved it (WHICH I TOTALLY DID!) I will however let the pictures do the talking! Look at all this workness!
Philip - In Brooklyn
Labels:
1910,
Movie Costume
Monday, November 7, 2011
Back to WOOOK!! 11/8/11
It's MONDAY! Life has been crazy for the Kathleen and I but things are starting to calm down. I found this strange little video and I hope you guys enjoy it. Afterall what's better on a Monday then an 18th Century food fight?
Philip - In Brooklyn
Labels:
18th Century,
Video,
WOOORK
Subscribe to:
Posts (Atom)