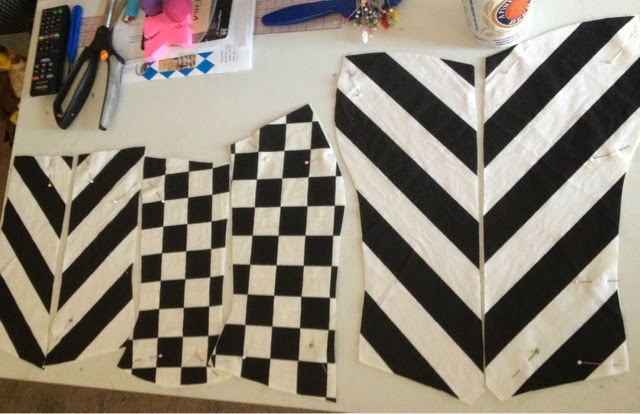
My bustier block, cut from scraps of black printed stripe and checker cotton with a white ground, flatlined in scraps of muslin.
Showing posts with label Halloween. Show all posts
Saturday, October 11, 2014
Halloweiner costume progress: Part the First
J'excuse dat Miller Lite in the background...
Labels:
bustier,
Halloween,
Miller Lite,
Patterns
Wednesday, July 20, 2011
Halloween is in the Works
Let me start out by apologizing for my blog-tastic absence. I have been working myself to the bone on my other blog project, http://www.hiremebobmackie.com/. The news over there is that I have begun the marathon leading up to Halloween! The plan is to do the Wizard of Oz cast but reverse the genders. I will be a Bob Mackie inspired Wicked Witch (see sketch below).
Pretty sweet huh?! I'll be posting milestones on here but for the blow by blow action visit the Bob Mackie Blog.
Philip - In Brooklyn
Labels:
Bob Mackie,
Halloween,
MGM
Monday, November 1, 2010
Princess Toadstool - Zee Jacket!
As Halloween was yesterday I can finally sit down and devote my time to my number one priority, you, my readers. So I finished my Toadstool costume and I was a HUGE hit. We'll get to that later, but I should start where I left off.
The jacket. She was FUN to make! After cutting it out and inserting the CB panel in muslin I tried her on with my hoops in order to make sure my shape was correct. Which of course it was... not saying I'm the bomb, but come on.
Sorry about my legs. I was sewing in a t-shirt and boxer-briefs...again.
Here is my jacket on the dress form.
The Lapels are not faced yet and the dress form is much slimmer then me.
After I got the shape correct I removed the muslin panels and inserted them in the self fabric. I reused the same pattern pieces of the shell for the lining only I split them at the waist so I could line the top in muslin for comfort. The peplum/skirt was cut out of the lighter pink to maximize the "wooork" factor. My faux vest front was the same pink and was lined in self. So the sewing was a bit tricky but if you've ever made a lined suit jacket or coat it's pretty much the same. I apologize for not having any progress photos of this part but I was on a roll. Check out the pictures below! I was looking at the jacket and it felt a little flat so I used on of those heirloom embroidery stitches that are programed in the machine and ran it around the lapels and the hem of the skirt. I've never used those before but since the thread was almost the same color as the fabric it really elevated the jacket! My motto during this whole project has been, "Devil is in the details", and we can all use a little Devil.
The finished and lined jacket on the form with the skirt and hoops.
Don't worry we'll get to the skirt soon enough.
The jacket shown open so you can see the lining and the skirt lining.
If you notice on the jacket the vest only goes past the front of the actual jacket by about 1 1/2". I tacked the jacket to the vest so that it wouldn't pull when worn.
A little advice on turning corners with those embroidery stitches. You have to pay attention to the way the machine stitches so that you can identify when it is about the end the shape so you can turn. I actually pulled my fabric to slow it down through the machine so that I wouldn't go past my turn point and it worked!
This is the inside of my jacket skirt. The bobbin thread contrasts VERY nicely on this color. Happy little accident. If didn't want it to show I could have used a matching thread.
Enter the sleeves!
Philip - in Brooklyn
Labels:
Costumes,
Halloween,
Nintendo,
Princess Toadstool
Thursday, October 28, 2010
Quickie Halloween Costume Update: West Coast Entry
Hey Y’all!
Just a little update over here from California…
Both Princess Ozma and the Kitsch Witch are coming along nicely!
Tomorrow I’m taking a vacation day to finish up these projects and truly enjoy the Halloween weekend.
Can’t wait to show everyone the final results…more to come very soon!
Kathleen –In Oakland
Just a little update over here from California…
Both Princess Ozma and the Kitsch Witch are coming along nicely!
| 2 dresses, 2 different looks: Reminds me of Ephalba and Glinda, lol. |
| All the notions and trims for both dresses, ready to be applied! |
Tomorrow I’m taking a vacation day to finish up these projects and truly enjoy the Halloween weekend.
Can’t wait to show everyone the final results…more to come very soon!
Kathleen –In Oakland
Labels:
Halloween,
Kitsch Witch,
Princess Ozma,
Return To Oz
What Lies Beneath? - Les Hoops
Why Hello There Peeps! So here is a brief description of the hoop skirt that I made in an effort to make my Halloween costume just that much more dramatic.
1) I set 6 long vertical strips into a wide waistband. Mine is 3" high. I backed it with a horsehair fusing.

In order to keep the weight of the skirt on tmy natural waist I should actually wear a waist cincher or corset. It makes your waist smaller and your hips will become a makeshift shelf that your hoops and skirt can rest on. In order to save me time I used eyelet tape (which I had lying around. Love it when I don’t have to buy shit) and sewed two vertical rows side by side. (I only topstitched on the outside edge so I can still lace through them). In order to maximize the amount of eyelets I could lace through I offset each strip as shown in the illustration. As you can see on the form I laced it as a normal shoe or corset alternating between the inner and outer strip of tape. So when it’s pulled tight it acts as a bo-bo waist cincher!
1) Baste your seam closed where you want to place your zipper.
2) Press open your seam allowance
3) You will sew straight across the bottom of your zipper to clean finish it. You place your zipper where it will finish. Flip your zipper vertically so it is right sides together (the zipper should be hanging down toward the hem of your garment) After sewing the bottom you will press up into place and have a nice clean finished bottom.
4) Edgestitch up both side tucking the bottom allowance under the zipper.
5) Cleaning the top edge up will depend on how your WB is finished. Usually a 2 piece waist band is best so you can sew the top edge into the lining seam.
Labels:
Costumes,
Halloween,
Hoop Skirt,
Nintendo,
Princess Toadstool
Tuesday, October 26, 2010
To Infinity and Beyond – Star!
After much toil and struggle I have completed my Infinity Star wristlet/purse! Well it wasn’t all that much of a struggle. All I did was sew a zipper pocket into the back and add an elastic strap so that I can hang it off of my wrist. As we all know Halloween is just another excuse to drink excessively. An AWESOME excuse!
So now I’m ready for anything that Halloween can throw at me. With my infinity star I am UNSTOPPABLE!
Philip – InBrooklyn
So now I’m ready for anything that Halloween can throw at me. With my infinity star I am UNSTOPPABLE!
Philip – In
Labels:
Costumes,
Halloween,
Nintendo,
Princess Toadstool
Monday, October 25, 2010
Bonus Round: Another Halloween Costume –The Kitsch Witch
Hey y’all,
Here’s another Halloween Costume that I’m working on….Who doesn’t love a classic kitschy witch? The good & pretty kind that you see on Disney’s "made for TV" movies starring Debbie Reynolds??
This one is NOT not a princess, but it IS made from a re-purposed dress, petticoat, and every bit of orange and black trim I have on hand. The only thing I had to buy was MORE orange thread!
An all-black version of the white dress I’m using for the Ozma costume…..purchased earlier this year at a cheapie, “Forever 21-type” store in Berkeley, CA. |
This is one of those slutty black petticoats in nylon tricot by Leg Avenue…the kind you find at every Halloween store. It was purchased a few years ago and NEVER worn. |
I repeated the same stitch treatment on the ruffle trim….9 yds of pre-gathered goodness! And yes, that’s a Miller Lite tallboy in the background….DON’T JUDGE! |
Part of the ruffle trim I stitched to the edge of the lace overskirt... |
The rest of the trim I placed in a spiral formation going up the overskirt. *The tiered ruffle portion of the petticoat was stitched to the underskirt ofthe dress for extra fullness. |
More to come!!
Kathleen -In Oakland
Labels:
Costumes,
Debbie Reynolds,
Disney,
Halloween,
Kitsch Witch,
petticoat,
Sewing
Friday, October 22, 2010
Infinity WHAT!? Infinity Star!
Oh yes my friends... I'll be needing a place to keep all my things on Halloween-er, so bring on the accessories! Of course I wouldn't want my "bag" to blend in with my ensemble so I opted for the Infinity Star. The yellow contrast is the bee's knees! All I used for the pattern was the basic star tool on Adobe Illustrator and printed it mad big. So far I've appliqued the eyes on. Up next is to insert a zippered pocket in the back, add a small elastic strap for my wrist (so it stays close when I'm out getting loaded) and stuffing that little mofo. I have a feeling he's gonna be a hit!
Philip - In Brooklyn
Labels:
Costumes,
Halloween,
Nintendo,
Princess Toadstool
Wednesday, October 20, 2010
Toadstool Update
Hey there lads and ladies! So as you can see the Queen of My Heart, Princess Toadstool, has a fly ass brooch that she rocks on the daily! So my costume would not be complete without my Toadstool Bling Bling.... SOLID!
Seen below is the finished product of my hard work. 17 karats of flawless Aquamarine Rhinestones extracted from the same mine as the Hope Diamond. Insurance value : $25.00
Shown below is my jacket main fabric pinned and ready to be cut out. 2 things about the jacket shell. 1) Haven't patterned the sleeves yet and 2) you will notice the center back panel is not being cut out just yet. I want to make sure that I get the right shape to achieve the look I want. Therefore I am cutting that panel out of muslin to see if I need to adjust the pattern piece. Measure twice, cut once as they always say.
Philip - In Brooklyn
Labels:
Costumes,
Halloween,
Nintendo,
Princess Toadstool
Monday, October 18, 2010
Princess Ozma …A.K.A. “Mom”
Hey y’all,
So…I am re-purposing/re-cycling a dress and accessories to make a Princess Ozma Costume…
![]() |
“Help me step through the glass, Dorothy.” |
My 1st attempt at making a Princess Ozma Costume was back in January. I only had one week to make something, so all I had time to do was create some pieces:
![]() |
| January 2010: Collar made from brocade gold scraps and green ribbons, worn over a simple muslin empire gown I already had on-hand. |
![]() |
January 2010: Wire headdress inspired by the costume from “Return to Oz” and the various cover art images from the Frank Baum books. |
White Lace knee-length dress I purchased earlier this year at a cheapie “Forever 21-type” store in Berkeley for like 20 bucks. This will become the Princess Ozma Gown. |
![]() |
Sparkly bright green edgestitching I added to the bottom hem and tulle ruffle on the underskirt. |
![]() |
The dress, with my old Ozma collar thrown over it, and green ribbon laced up the front. ***I am not happy with the optic white shade of the dress. |
Labels:
Costumes,
Disney,
Halloween,
Movie Costume,
Princess Ozma,
Return To Oz,
Vintage
She’s Crafty! Halloween: West Coast Entry
Hey y’all,
I just had a very productive weekend creating fabulous costumes for Halloween!!
As you can probably tell from Philip’s posts, this year’s Halloween them for Patterned History is “Repurposed Princess”
While Philip is utilizing a previously made skirt for his Princess Toadstool ensemble, I will be re-using a dress and accessories to make a Princess outfit too….here’s a little hint:
![]() |
| Emma Ridley as Princess Ozma in Disney's "Return to Oz" circa 1985. Hands down, one of the greatest Disney movies EVER made. Costumes designed by Raymond Hughes. |
![]() |
| I have always loved the Art Nouveau style in which Ozma is depicted |
And here’s a little magical awesomeness for your viewing pleasure:
Kathleen -In Oakland
Labels:
Costumes,
Disney,
Halloween,
Movie Costume,
Princess Ozma,
Return To Oz
Saturday, October 16, 2010
Makings of a Princess
Just a quick update on my H.R.H. Princess Toadstool costume. So I've taken the Waist Band apart in an effort to make it smaller so it sits higher on my natural waist. As it was the sheer weight of that monstrous skirt was pulling is down somewhere in Shakira territory. Not very appropriate for royalty.
My waist band was cut to be worn high and tight just under my rib cage. When I say tight I'm not lying! I made the waist band to finish 3 inches and i backed it with stiff horse hair interfacing generally used on coats. I cartridge pleated the top tier rather than gathering. It looks so much fancier!
![]() |
| Via Needlewoman.org |
I used the above cartridge pleating technique using gingham as a guide. Kathleen brought this trick to my attention. I used 5 rows of stitching with 1/4" Gingham. Instead of spacing my basting stitches out so far (as shown in the photo) I followed the check for my stitch placement. As you can see the result were marvelous!
I already have removed the green lace off the bottom tier. I have to add one more tier to the bottom which I will make from a contrast color that I am using in the bodice. Why do I need to add one more tier? It looks long enough you say. Did I fail to mention I built a hoop skirt for this bitch? Hells yeah I did! And since the hoop circumference is so big it picks the skirt up off the ground. Oh well no bother. I'll just have to make it look that much better! My next update will be about the hoops. That's all for now.
Philip - In Brooklyn
Labels:
Costumes,
Halloween,
Nintendo,
Princess Toadstool
Subscribe to:
Posts (Atom)