Showing posts with label Machine Knitting. Show all posts

Wednesday, February 23, 2011

Public Enemy Finished Product

            Hey there readers! Sorry about the delay in posting the finished sweater vest, Public Enemy. Being that my camera ran away from home one night it was tough to take pictures of my progress.  I did get myself a new camera though, so all is not lost and life can continue.


Well look what we've got here... well if it isn't a finished sweater vest.

     When I last left you I had seamed up one shoulder in order to knit and apply the ribbing.  First I knitted the armhole ribbing the width of one of the armholes.  After it was finished I transferred the stitches from the ribber onto the knitter bed and hung the armhole onto the machine and crochet cast off the seam. 
     I wanted to try something new for the V-neck.  Usually I knit the neck band in 2 pieces (round necks can be knit in 1 piece if the knitting machine is large enough), 1) one side of the front and the back of the neck and 2) then the other side of the front.  But I figured since I was going to sew the center front as a miter I figured I would just knit it all in one piece and sew the center front like you would a jersey or any other cut and sew knit.

     Here is the inside view of the Neck rib at the bottom of the "V".  The trouble I found is that the bulk of the rib is a bit annoying but when you're wearing it you don't even notice it.  Going forward I don't think I will repeat this technique  I like the 2 piece neck better because if you sew it mitered you can press the seam allowance open and tack it to the seam and it looks much flatter. 


     Here is the outside view of the finished Neck rib.  The bulk of the miter isn't all that noticable.  But as I said before I'll stick to the 2 piece neck rib. 
    After my neck rib was finished I sewed up the other shoulder then repeated what I did for the previous armhole.  All that was left was seaming up the side and weaving in loose ends.  So far I've worn it once and it looked SUPER dapper.  Next time I wear it I will make sure to snap a couple pics for posting.

Philip - In Brooklyn

Wednesday, January 26, 2011

Quit Frontin'! - Public Enemy

            Ladies and Gentlemen.  I would like to proudly introduce... THE FRONT!  (The crowd goes wild!)  So I whipped up the front of Public Enemy and it ended up being easier then the back for some reason; not sure why.  I blocked that fool and look at it, just look at it!  Marvel in its majesty.  I'll leave you with your thoughts.


More to come...

Philip - In Brooklyn

Friday, January 21, 2011

The Backside - Public Enemy

            Hey there Patterned History folks!  I finished blocking the back of the sweater-vest I am lovingly calling Public Enemy.  It looks awesome and came out perfectly on spec!  I can't wait to knit the front and wear this little sucker out.  I think it'll look amazing with a light colored shirt under it and a nice black sport jacket... maybe I'll bust out a tie for the full affect!!


Philip - In Brooklyn

Thursday, January 13, 2011

Public Enemy - Cable Swatch

           So I sat my happy ass down last night and did some cable swatching.  So I ran 3 plys of Navy Merino Wool through the machine at tension dial #6.  Looks pretty rad!  The first couple cables look a bit bucked up but then I figured it out on the last 3 passes.  In addition to using tension #6, I also used the switch on the ribber that makes "softer" purl stitches.  The swatch is incredibly soft and lofty.  I CANNOT wait to knit this sweater-vest and rock it on the daily!  John Dillinger ain't got shit on me!


Philip - In Brooklyn

Tuesday, January 11, 2011

Always on My Mind - Public Enemy

          My Mind was wondering today so I started sketching a sweater I've been mulling over.  Ever since I knitted Ryan his V-neck Sweater Vest I've been pining for my own.  While watching "Public Enemies" I spied a Navy Blue sweater vest that looked like it had some fancy cabling going on.  It was that instant love at first sight you feel in a fleeting glance just before it disappears.  The man wearing it was a non speaking character so I can't find any pictures of it online.  So I'll just have to go off of initial gut inspiration.  The plan is to do a varigated cable on the front and back of a solild color Navy Sweater Vest.  I think it will be super sophisticated.  The rich Navy color will be very masculine and the cables will add a touch of soft texture.


           I have a few pounds of Navy Merino Wool that I plan on trying out on this classy little number.  It's fairly thin so I'm gonna try running it through the machine 4 plys; probably on tension setting 4 or 5 so it's not too stiff.  Just for shits and giggles I think I'll try 3 plys Navy Merino and 1 ply Black Wool Mohair I have, just to see how it looks.  Certainly more to come on him, Public Enemy.

Philip - In Brooklyn

Tuesday, December 28, 2010

Seawolf - Finito!

          Hey there P.H. peeps!  So the day has finally come Seawolf is FINISHED!!!  I got distracted by projects that had due dates but that's forgivable.  In order to finish my baby boy all I had to do was set in the sleeves.  So I pinned those mugs in place and used the yarn tails and back stitched them in place stretching slightly after a few stitches to make sure the seam didn't tighten.  Then I wove in all the loose ends and VOILA, a finished sweater!
CHECK IT!
Please forgive my appearance...
I was snowbound indoors that day so cut me some slack.


For your enjoyment I've included the video "Wicked Blood" by the band Seawolf.  
One of my faves.  Enjoy!


Philip - In Brooklyn

Monday, December 27, 2010

Sea Wolf - Ribbed for Everyone's Pleasure!

            The snow fell in record numbers last night.  Almost 20" in some places!  Hopefully this reaches the outside world before we run out of provisions.  I'm sure it will, the internets is crazy magic.  Since I have so much indoor time on my hands I thought this would prove to be the perfect opportunity to share with you the ribbed collar and pocket ribs I hooked up on Seawolf.

           I learned from a video on machine knitting back in the day how to construct and finish a sweater.  The nice lady recommended sewing on shoulder together then rehanging the neck line back on the machine so you can attach and knit the collar rib all at once.  After the Neck rib is finished you can cast off the rib and seam the other shoulder and neck rib all at once.  It's a great idea and works like a charm.  The only thing I find tedious is casting off rib knit so I found another way to work it out.  So my system is to hold the neck line up to the machine to see how many needles I will need to rib.  But instead of hanging the sweater back onto the machine i just knit the rib as you would any other piece of the sweater.  


          When you reach the proper width you desire you just transfer all the needles onto the knitter and then hang the neckline onto the machine (purl side facing you).  Then you crochet cast off and BOOYAH!  


          The ribbing is complete and sewed on all in one simple and easy step.  The only thing you have to keep in mind is that when conventionally knitting you normally have your end stitches on the knitter, but since you are knitting so that you will be sewing right sides together you will need to have your end stitches on the ribber.  On a crew neck or "U" shaped neck line you can knit the neck rib all in one piece.  On other shapes such as V-Necks and Shawl Collars like mine you will need to knit in two pieces and seam at the shoulder.


           For the ribbing on the pockets I did the same thing.  I used the tails to sew the sides to the body in place.  They turned out just right!  Next up... Attaching the sleeves to the body!


Philip - In Brooklyn

Monday, December 6, 2010

Seawolf - Front


            Hello everyone.  Seawolf is coming along nicely.  Finished kitting the front.  I designed the sweater to have a kangaroo pocket on the inside, hidden if you will. I wanted to knit this in a way that had as little sewing as possible.  Here is a quick run down of how it went.

1) Knitted the bottom rib
2) Using waste yarn marked the center needles where the pocket will be placed
3) Knit to the bottom of the pocket opening
4) Put sides on hold and knit center stitches and decreased as pattern shows for pocket
5) When pocket is finished cast off top onto waste yarn. Remove from machine and let hang to the knit side
6) Rehang the marked purls back onto the machine knit to bottom of pocket opening
7) take sides off hold and continue to knit to the top of pocket
8) Transfer center needles onto the ribber to move them out of the way
9) Rehang the top of the pocket onto the machine making sure no stitches get dropped and unravel waste yarn cast off
10) Transfer needles from ribber back onto knitter and continue knitting


           I continued kitting up to the bottom of the armhole, marked those and decreased for the shaping.  I designed this so it had an area of purl stitched surrounding the neck to give it some stitch texture.  This was easy to do since I followed my pattern grid and just transferred the stitches to my ribber.  I had to do some partial knitting and some decreasing the shape the neck and the shoulder slope.  After all that it turned out pretty nice.  Notice the pink yarn?  It is waste yarn that I knit the shoulders onto so I can "graft" the shoulder seam together.  Grafting is simply a way of attaching shoulder seams seamlessly.
 

           I hope you enjoy the pictures of my progress.  More to come soon!
 
Philip - In Brooklyn

Tuesday, November 23, 2010

Seawolf - Sleeve Y'all

            So this little puppy is finally getting some love again.   I broke out the knitting machine and whipped myself up some sleeves.  First i had to finesse my pattern a bit and work it out on a grid.  I decided to knit it with a cable design going down the sleeve.  I used my Hand Manipulated Stitches For Machine Knitters book that I purchased earlier this year and found a beautiful opposing rope cable. 
            I patterned my sleeve out on a knitters grid in order to mark out all my increases and cable crosses in order to make sure no row counting got messed up.  That happens a lot and cables must I say MUST be placed the same amount of rows apart.  No one wants wonky cables.  Unless you're into that sort of thing, but I'm certain that's exactly the sort of thing that would get you into hot water with one, Mr. Joe McCarthy.

             Don't worry fellow knitters.  I plan on doing a post on machine knitting cables, please stayed tuned.

Philip - In Brooklyn

Sunday, October 3, 2010

Seawolf: The Back


            Hey there blog readers.  Welcome back.  It’s nice too see you again.  I’ve missed you.  So allow me to bring you up to speed on Seawolf.  Things are going well.  The back panel is finished.  Allow me to walk you through the process.


*** Techy nerd alert! You’ve been warned! ***

So I’ve worked out my spec for the size of this sweater.  I started with my standard pull over sweater and graded it up one size since I want it to feel roomy and cozy.  Now that my spec is done I can enter it into my secret machine-knitting weapon.  I’ve developed a knitting pattern on Excel (registered trademark of Microsoft) that writes the pattern for your knitting based on your sweater specs and gauge.  It was pretty complicated to develop, but once I had it down it RULES!  If I ever need to change any specs, i.e. drop the armhole or widen the body, I reenter my numbers and the spreadsheet recalculates the whole pattern (insert 1960s technology sounds ala “beep beep boop boop”).  It’s not a completely thought free system though.  I have to add sections if any design details change.  It is invaluable though.  A lot of times my gauge is not always correct when I knit a small swatch.  In machine knitting it is recommended that you knit a large swatch in order to get a more accurate gauge. 
            Instead of knitting a large swatch, mostly because I’m impatient, I just swatch a normal sized piece.  Then I write my pattern based on that gauge, then I knit up the back of the sweater.  Usually there isn’t a lot of design details or shaping on the back of the sweater so it usually doubles as a large swatch for me.  I know, I know, “Haste makes waste”.  My rebuttal to that is, “Don’t drive in the left lane on the highway if you don’t wanna drive fast” and “Highway to the DANGER ZONE!”  So I knitted the back of my sweater and then I blocked my panel.  After checking the specs of the length, body width, neck width, and armhole depth; it turned out to be perfectly on spec.  Who’s house?! My house.
            So allow me share with you some pictures of my process.

This is my knitting machine.  She’s a Brother KH-260E (the E is for Eleganza… tres chic!) with a matching KR-260R Ribber.  Ahh she a trusty steed.


These are the cones of the yarn I am using.  I purchased them at the Silk City warehouse sale that happens once a month in New Jersey.  If you’re a machine knitter I would recommend you check it out.   www.silkcityfibers.com has all the details on the sale.


This is my swatch after I steam blocked it.  Notice the 4 eyelets on the left side.  As I’m knitting my swatch I put eyelets in them to indicate the tension I used on the machine.  That way I can swatch yarns to see how they look,, and then I can easily refer back to them later if I like the tension.  I learned that little trick from my college machine knit teacher Cindy Taylor (Can I get a “what what” for C. Tays?!).  As you see in the picture my sweater will be knit on dial tension 4.


This is my machine after I casted on my ribbing in a manner that is referred to by the manual as “perfect selvage” (see your knitting machine’s user’s manual on how to do this properly as each make of machines could be different).  I chose to do 2x1 ribbing.  It’s actually a knit 2 purl 2 in essence.  But the way the machine is set up there is 2 needles in work and then 1 needle left out of work on the knitter bed and the ribber bed.  It’s a pretty way to do ribbing, and I find and it looks more like commercial sweaters.  Almost forgot to note!  When you knit your ribbing you should always turn the dial down 1 step on the tension.  In this case my ribbing was knit on tension 3.  I’m not gonna lie to you.  This yarn was fragile and tore easily.  Immediately after I took this picture the yarn shredded in two places so I had to begin again.  It turned out when I was doing my perfect selvage I had the tension too tight.  The second time it was actually perfect!  The moral of the story is follow the manual exactly!


This is my finished ribbing!  After I transferred the ribbed stitches to the knitter bed I took the ribber bed off so you could see it fully.  This is the moment where you MUST MUST MUST remember to change your tension to the correct setting.  I can’t tell you how often I went right into knitting the body on the ribbing tension.  Don’t let this be you.


Here’s a close up of the ribbing…. Oh la la! I know it looks loose now.  But don’t worry.  It’ll tighten up.  That’s what she said.


So here is the body of my sweater knitted up to the armpit point.  I always use scrap yarn to mark the armpits, (not shown in photo) which makes it easier when seaming up the sweater.


Now here we have the sweater after I have decreased the armhole shaping.  I did a decrease two stitches every 2 stitches.  Now that I’m looking at it I probably should have done decrease 2 every 3-4 rows to make it look more commercial, but c’est la vie.  Live and learn.


Now I’ve knitted the back between the armholes and I’m getting up the neck.  This is where I put in the stitch change area to change to purl stitches.  I’ve reattached the ribber and have transferred the stitches that I want purled to that side.


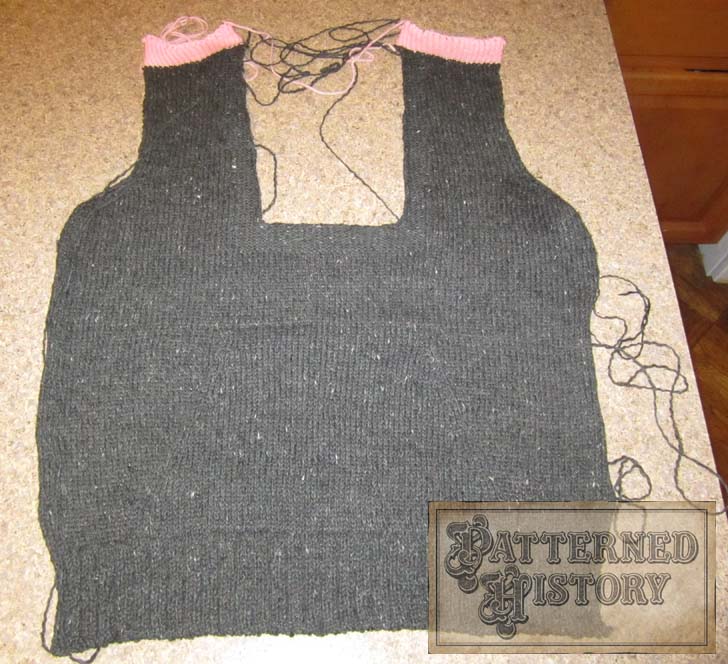
Shown here in this photo is the complete back panel.  I did my shoulder slope shaping by partial knitting and I’ve shaped the back neck by decreasing toward the shoulder.  Sorry I didn’t take pictures at this point.  I was in a groovy and completely forgot.  I won’t forget when I knit the front.  The pink yarn is where I have knitted my shoulder and the center of my neck onto waist yarn.  Waist yarn is yarn that you will remove later, but they hold you knitting so it doesn’t unravel. 


This is the reverse side of the back panel on my ironing board where I am steam blocking it into the correct shape and size.   Preferably I would like to have a blocking board which is basically a huge padded area that you can pin your knitting to and steam it flat all at once and let it dry, but I make due and it works.


This is the back panel shown on the right side of the garment.


Here is a nice detail photo of my bottom ribbing.  Notice how the knitting tightens right up. 

            The fabric turned out VERY nice.  It’s soft and cozy, as a wool cashmere blend should be!  Also at the same time it is light weight and drapes nicely.   I apologize if this post was long winded, but I’m sure if you got to this point you’ve enjoyed yourself.  I’ll be posting soon about the other pieces of the sweater!

Philip- In Brooklyn


Saturday, October 2, 2010

Seawolf

 
               So I done designed myself a sweater!  I bought this yarn almost a year ago, and I’ve finally thought of a project worth its majesty.  It is a gray tweed cashmere wool blend and it's so soft you wanna punch the person next to you for no reason at all!  May I introduce you to Seawolf.  


Seawolf is a shawl collar pull over sweater with a welted kangaroo pouch pocket.  For stitch interest I’ve decided to do a stitch change around the collar.  I put a 1 ½” area around the collar where the stitches change to purls.  I’ll be sharing the pattern after I finish the sweater.  Since this is a work in progress, and my first shawl collar, I may need to finesse the pattern a bit before I share it with people, but let me know if you’re interested in the pattern!
Trust me there is plenty more to come.  I've already begun knitting and I'll post shortly on the progress!

Philip - In Brooklyn

Monday, September 27, 2010

Inspiration – “The Great Gatsby”

            In July of this year there was a 1920s Lawn Party out on Governor’s Island.  So of course I had to make myself, and my mans, some sweet sweet “Great Gatsby” digs.  I chose to make myself a waistcoat and knitted Ryan a V-Neck sweater vest.  Of course my inspiration behind these beauties was Mr. Jay Gatsby himself as portrayed by Robert Redford. 

Here is a photo from the movie of Redford and Mia Farrow. 
Redford is wearing a cable knit V-neck sweater. 

The event we went to was in the dead of summer and it was about 9,000 degrees out.  So I opted for to make a vest instead of a full sweater.  Ryan, the poor sap, would have dropped dead in that heat… and most likely taken me down with him.  Ryan’s vest was machine knitted light weight white alpaca wool.  I took some liberties (GASP!), and added a merino wool navy stripe to the hem, neck and armhole ribs.

Ryan wearing his sweater vest, he held up well in the heat.
I use a Bother KH680 Machine with Ribber attachment.  This was my first project where I employed the use of a cable stitch.  Turned out pretty good I must say!  You can say it too if you like, down in the comment section.  Don’t be shy.

Here is Redford in a White 3 piece suit.
 
This is me.  A few refreshing drinks into this shindig.

I used the 3 piece suit as inspiration for the double breasted vest.  It is made of white summer weight wool with an off white slubbed silk lining and back panels.  The notched lapel is what drew me to this design.  I used a contemporary pattern, so there goes the period accuracy.  Although I did tailor the fit so I could forgo that stupid adjustable strap on the back. At least I looked good doing it though?

Philip - In Brooklyn 

Monday, September 20, 2010

SPECIAL DELIVERY!


            So I come back from lunch and what did I find?!  Bound INSPIRATION!  I ordered two books from this little mom and pop book website called Amazon.com, and they finally arrived today!  WOO HOO!
            Hand-Manipulated Stitches for the Machine Knitter: by Susan Guaglimi and J.C. Leyendecker: by Laurence S. Cutler and Judy Goffman Cutler, I wonder if they’re bother and sister.  I’m gonna be pouring over these for the next few days so you best believe I’ll have future posts on these subjects!

-Philip in Brooklyn
Related Posts Plugin for WordPress, Blogger...