Saturday, November 8, 2014

I owe lots of updates on Halloween...

And here we go!

Dress came out great and fit well.  Here's the only pic I have of me in it for now:


Why am I standing this way?
I dunno...must have been feeling like a furry superhero :)

More pics of the dress coming together:


More later on the furry accessories!


-Kathleen, in Oakland

Thursday, October 16, 2014

More progress: bodice and skirt


Bodice pcs are stitched together.  Now I'm leveling out the skirt shape:


Halloweiner costume: prepping the bodice pieces

Hey Y'all!

More progress:  Flatlining and prepping the pieces for assembly.

After cutting, each piece of fashion fabric and muslin are layered together, then sealed together by stitching the edges.  
First, a straight stitch on the sides to stabilize the layers from moving around.
I use the longest stitch length on my machine, 3/8" from the edge with no back-tacking.  This acts as a running stitch or tailors tacks, and tension can be easily adjusted later to ease fullness and get pcs to join smoothly.  
Next, they are finished with a zig zag stitch on a long setting to encase the raw    edge. This can be done with a serger, if you have one.  
I used random neon thread on the top side of the zig zag for a little pizazz on the inside:

CF Pcs: note the fullness at the bust curve has already been eased up a bit with the straight stitch for good cup depth and fit:

Side Front Pcs:

Side Back Pcs: (that puckering will go away when assembled)

Center Back Pcs:

-Kathleen, In Oakland


Saturday, October 11, 2014

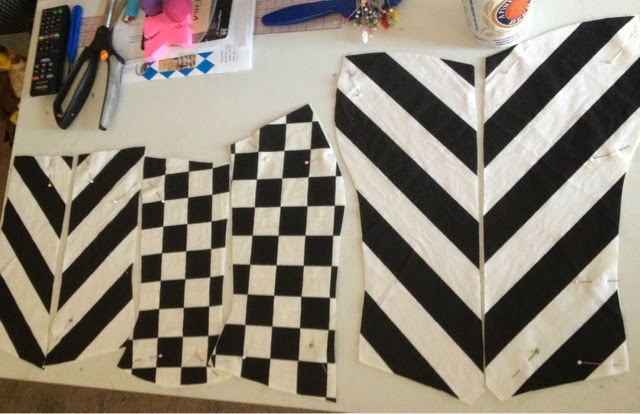
Halloweiner costume progress: Part the First

J'excuse dat Miller Lite in the background...

My bustier block, cut from scraps of black printed stripe and checker cotton with a white ground, flatlined in scraps of muslin.  


-Kathleen, in Oakland

Monday, September 29, 2014

Back To WOOORK! 9-29-14

Sup! 
It's Monday! 

I made this. 

It went to Burning Man and didn't fall apart. 
Enjoy!


-Kathleen, In Oakland

Monday, September 15, 2014

Back to WOOOOORK!

Huzzah, Bitches!

It's Monday!
Let's look at some purdy shit!

I made this.  Just a lil crop peasant blouse for all my Oktoberfest needs.  Such as the stein holding contest, which is the only kind of sport I have ever placed in. 

Kathleen, in Oakland

Thursday, May 22, 2014

OMG, Ponies!!!

Hi Everyone!

Another finished project to share today!
 
This one is great, because it was almost a total failure, then it became something better than the original plan!
 
This project involved Frankenstein-ing a couple of shirts together to make one really awesome shirt ...WITH PONIES ON IT!
Did I mention there were ponies?
And glitter? And tiny blue rhinestones? And NO pink??
Yeah.  
Found this shirt in the Girls dept. at Old Navy. I bought the biggest size (XL) but it was still too small.
I tried cutting it up to re-work the fit...still, nothing wearable.  
Defeated, I put the shirt away in hopes of figuring something out, one day.
Months went by...
Then, I was doing some spring cleaning and found a basic men's size M tee in my stash that happened to be the same shade of blue as the pony print! A vibrant violet blue!

So, I turned the mens Medium tee into a Women's 8 Size Size 10 peasant top! 
Here's a lil' sketch of what I did:
 
Red line indicates the changes:  Crew neck was cut out and changed to "peasant" style with adjustable ribbon drawstring.  Side seams were added to reduce the waist and add curves in the right places.
 After that, I simply cut out the pony print, and machine appliqued the image on top of the shirt, using a 2 rows of straight stitches, 1/8" apart, approx. 3/8" away from the raw edge.
The finished product looks like THIS:

En Voila!  After the scoop neck & keyhole are cut, all edges are finished with a zig-zag.  Keyhole edge is turned back approx. 1/4" then sewn with a straight stitch about 1/4" from the folded edge.  Next, neckline is turned back approx 5/8" and sewn with a straight stitch about 1/2" from the folded edge.  This forms the channel for the drawstring, which is threaded through and ties at the CF keyhole.  Approx. 4" total was removed at the waist area through the side seams to give a bust-waist-hip ratio instead of one big tube shape.
And THEN...I gave the shirt to my "baby" sister, Mary...she loves ponies too...tee-hee!
As you can see, it fits her great, and she is very happy:


Another project....DONE!!!!

I will do another post on converting Man-Tees into Girl-Tees in the near future :)


-Kathleen, In Oakland


Wednesday, May 21, 2014

Let's have a Kiki, with thread!

Hi Everyone!

Lots going on...lots of projects to share!

Today's post is something small:  Making patches from fabric scraps.


3 Paches created on the sewing machine with various neon threads.  The patch at the top is made from a scrap of black corset coutil.   The 2 at the bottom are made from denim scraps.  All are edged with a zig-zag stitch to encase the raw edges.

I doodle and sketch ALL THE TIME. 
 
Fun Fact: If I'm in a meeting and appear to be taking detailed notes, there's a 90% chance that I'm probably sketching up a new project or doodling something cute, like this....Yay, Kitties!

 If I want a tiny project to work on & finish quickly, I turn some of my sketches into patches.
Simply copying the image to a square of sturdy woven fabric, and embroider by hand or machine.

I doodled this on a manila folder at work, allegedly:

This doodle became a patch, which was later used to mend a motorcycle jacket for a friend, who's nickname is "Moose"


I usually sew BIG projects with one color of thread (black, white or natural) so making these patches are a nice change of pace, and COLOR.

I love working all the bright color threads against the dark background, and this is a great way to flex the stitching skills.

I have never "embroidered" by hand before, and was just sort of freestyling here...
First, I sewed the image using a backstitch, with about 3 different shades of yellow thread together:

 
Then, went back over everything again to fill out the spaces, using some other stitch I may have made up, linking the backstitches together:

This patch is for my sister.  Her nickname her whole life has been "Kiki"  Ain't she LUCKY!?

 -Kathleen, In Oakland

Tuesday, May 20, 2014

Monday, November 28, 2011

Back to WOOOK!! 11/28/11

            I hope everyone had a wonderful Thanksgivings!  I spent the entire weekend building Ikea furniture and setting up my Black Friday purchases around the house (we only bought interior type stuffs).  We did take breaks every now and again... 7 - 40 minute breaks in fact.  This was the perfect amount of time to fully take in the glorious show that is "Downton Abbey."  We watched the entire first season over the weekend.

            I'm not going to bore you with details about the show or how much I loved it (WHICH I TOTALLY DID!)  I will however let the pictures do the talking!  Look at all this workness!


Philip - In Brooklyn

Monday, November 7, 2011

Back to WOOOK!! 11/8/11


            It's MONDAY!  Life has been crazy for the Kathleen and I but things are starting to calm down.  I found this strange little video and I hope you guys enjoy it.  Afterall what's better on a Monday then an 18th Century food fight?

Philip - In Brooklyn

Tuesday, September 6, 2011

Back to WOOORK!! - 9/6/11


             We had Monday off, thank the lord baby Jesus for Labor Day!  I heard the original reason for Labor Day was to celebrate the birthing Mary endured for our lord and savior but they moved it to December in order to make winter a little more fun.  Not sure if that's true or if I made it up.

             Speaking of labor how about the work it takes to get to the top!  Well as I've always said I'm not opposed to the pretty girls marrying well.  Billie "Glinda the Good Witch" Burke had the right idea.  She was the second wife of one, Mr. Florenz Zeigfeld.  Maybe you've heard of him.  Inventor of the Ziegfeld Follies... Father of Broadway.  Well if you're gonna aim girls... AIM HIGH!  With a mug like that a gown that chic one can't help but have men throwing themselves at you...... WOOORK  it out lady friend!

 Philip - In Brooklyn

Monday, August 29, 2011

Back to WOOORK!! - 8/29/11

            Well now that the Great Hurricane Scare of 2011 is over we can all finally get back to our normal lives.  But will anything ever be the same?  Of course it will!  It's Monday and you've still got to work.  So charter a burro and get your lazy bones into the office or so help me... SO HELP ME!!!


            Lucille Ball.  Maybe you've heard of her.  She starred in a little TV show called "Life With Lucy".  Well Miss Ball was working it long before she made her mark on TV.  She was in a delightful movie called "Dance Girl, Dance" (1940).  She played a dancer who worked her way to the top as a bawdy burlesque hoofer.  So if she can do it looking this good then you've got no excuse.  Se get out there and WOOORK!  But don't forget to stretch, because "I live to DANCE!" 

Philip - In Brooklyn

Monday, August 22, 2011

Back to WOOORK!! - 8/22/11

           Ok Monday... we get it.  You can stop now.  Everytime I turn around it's Monday!  I feel like it was just Monday like 7 days ago!  Oh well... I have to apologize for my lack of posting.  My job has kept me extra busy to where I had barely enough time to write anything but emails.  But now I'm back and you're safe.

           So I was on Zappos and I came across the vintage looking men's shoes... and that gots my brain to thinking.  How fly would I look if I revamped my wardrobe to be entirely 1920s?!  Talk about SUPER DUPER WOOORK!  Now I haven't decided if this is something I am actually going to do.  After all it would require A LOT of commitment and a decent amount of money.  Swanky clothes ain't cheap...  but I would look pretty WOOORK!!

I'll take one of each... in 3 every color.

The is NOTHING better than a vintage tux.

Philip - In Brooklyn

Monday, July 25, 2011

Back to WOOORK!! - 7/25/11

            Mondays ugh!.... Am I right?  Don't get me started.  Don't EVEN get me started!  Take a cue from Anita Page.  Throw on something rife with sex appeal, give Monday a sassy look and say "Put an egg in your shoe bustah.... and beat it."


Philip - In Brooklyn

Wednesday, July 20, 2011

Halloween is in the Works

               Let me start out by apologizing for my blog-tastic absence.  I have been working myself to the bone on my other blog project, http://www.hiremebobmackie.com/.  The news over there is that I have begun the marathon leading up to Halloween!  The plan is to do the Wizard of Oz cast but reverse the genders.  I will be a Bob Mackie inspired Wicked Witch (see sketch below).


               Pretty sweet huh?!  I'll be posting milestones on here but for the blow by blow action visit the Bob Mackie Blog.

Philip - In Brooklyn

Monday, July 11, 2011

Back to WOOORK!! - 7/11/11


            Monday is upon us once again.  Let's all take a lesson from Miss Dietrich.  If you have to work.  You may as well show up looking like this.  WOOOORK!!

Philip - In Brooklyn

Monday, July 4, 2011

Happy 4th of July!

HAPPY 4TH OF JULY EVERYONE!!!

Try and take it easy today.

Wednesday, June 29, 2011

Finished! Emma's Bonnet

Hi Everyone,

Here's another little project I finished recently.  It's a dog bonnet for my friend's beautiful adopted puppy, Emma.

Ain't she adorable, y'all?? 
Meet Emma!

This bonnet was based off of Honey's old calico one.
A little technical sketch and measurements of Honey's original bonnet.

Pattern drafted of the brim, body, and crown based on Honey's bonnet measurements.

The pieces, all cut out in black & white polka dot cotton.  I cut an extra piece of the crown in plain black cotton, which will be the lining.  The brim is "Cut 2"  in self fabric and "clean finished" along the front and side edges.
The bonnet coming together:  The body is bound in black  bias tape at the edges of the ear holes.  The brim is gathered and about to be attached to the body.  The body is gathered into the crown, and will be sewn after the brim.

Brim is stitched to the body to the wrong side with grosgrain ribbon folded in half and layered on top.

Outside View #1:  The brim and ribbon trim is pressed to the outside and topstitched in place.  The body of the bonnet has been gathered and sandwiched in between the crown self and lining before sewing.

Outside View #2:  Grosgrain ribbon has been applied as binding to the bottom edge of the bonnet.

Inside View:  As you can see, this construction method "clean finishes" the inside of the bonnet with no raw edges.  Built tough.  Built to last.....That's how I roll!

Close up of the bonnet's brim detail.  (Sorry for the weird lighting...it  was a beautifully bright day!)  I created matching grosgrain bows that will sit on top of each ear.  Hella Cute!!!

And here's another view of the bonnet flat, with matching grosgrain ribbon ties tacked at the sides of the bottom edge.  The narrow plaid ribbon is tacked at the front and back sides, and sits under Emma's ears to hold the bonnet in place.

Finished!  A front view

....And a side view
Stay still, Emma!!!  The bonnet fits a little big all over, but she's gonna grow into it!

Emma and her lovely bonnet were going to make their debut at this year's Pirate Faire in Vallejo, until we found out that dogs were not allowed this year.
To bad, really...
Emma's a wiggle-worm of a puppy, but she's quite the well-behaved lady...except when she's trying to drink your beer...watch out!  She's a big fan!
I'm a Miller Lite gal myself....but to each her own!


-Kathleen, In Oakland
Related Posts Plugin for WordPress, Blogger...